Visitor Attributes
Overview
Enrich your visitor profiles and personalize site content with Visitor Attributes
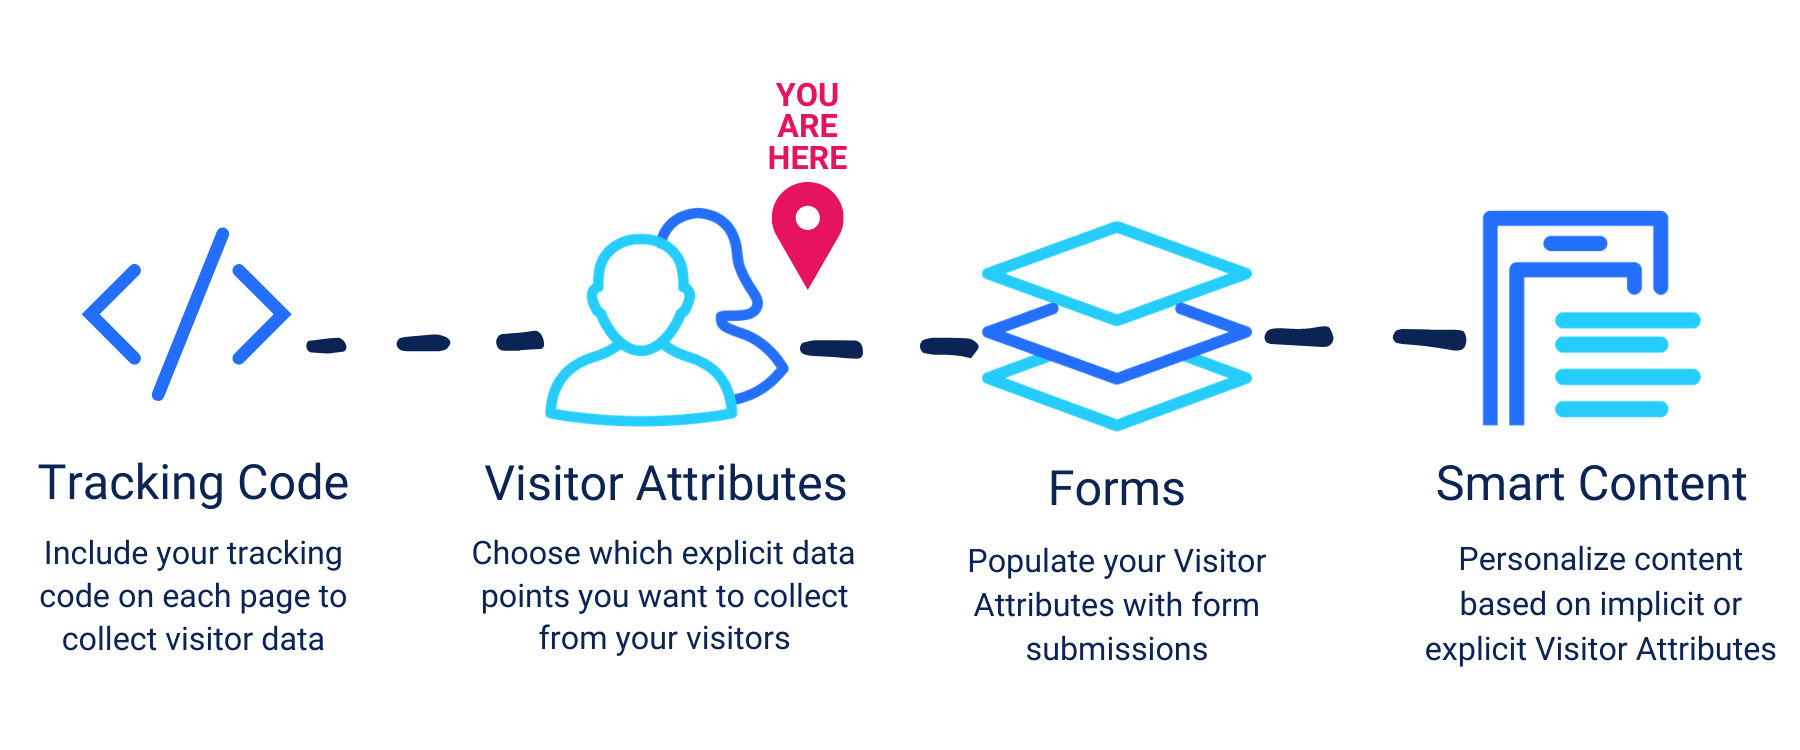
You may collect many pieces of data from visitors via your site's tracking code and through form submissions on your site; some of which are characteristic of your visitor. Visitor Attributes let you specify which explicit data points you'd like to store with a visitor. These can be used to create more informative visitor profiles and personalize Smart Content.
Implicit versus explicit attributes
Implicit attributes are preset data points, such as geolocation or page views, that are collected automatically about visitors when they arrive at your site. See available implicit attributes.
Explicit attributes are custom data points, chosen by you, that visitors offer about themselves through form submissions on your site. You can create new explicit attributes.
Dynamic attributes are data points that are assigned to visitors based on one or more rules that you configure.
Creating explicit Visitor Attributes
To create your own explicit attributes, visit the Visitors > Visitor Attributes area and click Create a Visitor Attribute. Configure the following options:
-
Visitor Attribute Name - Pick a name for your attribute that will be used to identify it inside Clive.
-
Description (optional) - Give your attribute a description to help characterize it in the Visitor Attributes area.
Populating explicit Visitor Attributes with form fields
Whether it's inline fields or Custom Fields, the Visitor Attribute picker allows you choose which fields populate your explicit attributes. To get started:
-
Edit or create a form field to associate with your Visitor Attribute.
-
Under Visitor Attribute, select the explicit attribute you'd like this field to populate.
You can associate multiple fields with the same attribute and the most recently-submitted value will be stored with the visitor.
Dynamic Visitor Attributes
Visitor Attribute values can also be assigned to Visitors based on rules. To configure a Dynamic Visitor Attribute, create or edit an existing Visitor Attribute and then:
- Click Add New Possible Value.
- In the Value field, enter the value you'd like to assign to a Visitor based on the rules you'll be defining below it.
- Using the dropdown menus, set up rules that must be met in order for a Visitor to be associated with the Value you've configured.
Example: Let's say we want to identify a particular person browsing our site as a marketer or a developer. We can use rules here to indicate that if a person has searched the term "marketing" or has visited a URL with the word "marketing" in it, we'll populate a Visitor Attribute named "User Type" with the value "Marketer".
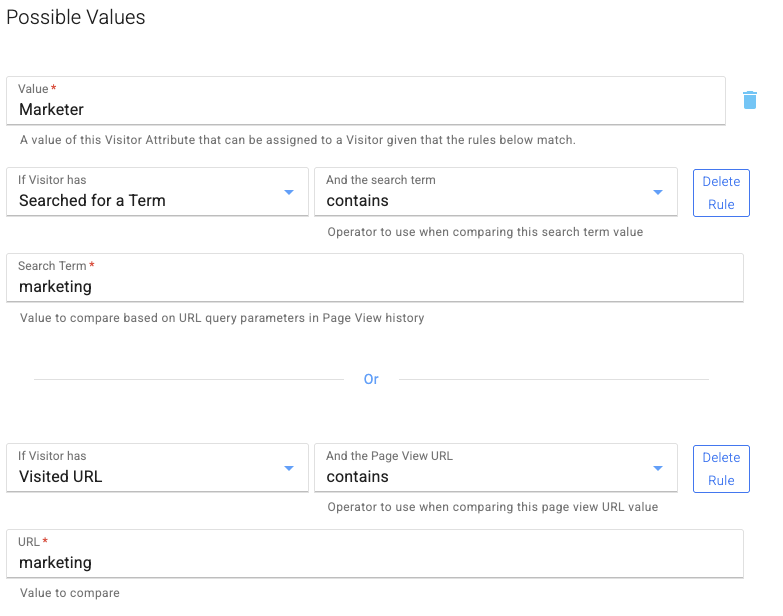
Similarly, we can create a separate rule to identify whether or not the user has ever searched the term "development" or visited a URL with the word "development" in it (and if they have, we'll assign a value of "Developer" to our Visitor Attribute).
The Historical value importance field allows you to determine which possible value should be used in the event that there are multiple matching rules. The scoring can be configured as one of the following:
- Frequency - All PageViews count equally, regardless of when they occurred. The value is chosen by the total count of matching PageViews.
- Balanced - Recent PageViews have higher importance when determining the value, but a large number of older PageViews can still influence the result.
- Recency - The most recent matching PageView determines what value is selected.
Continuing our example from above, if we use Frequency for this attribute, a person that has searched the term "marketing" 4 times and "development" 2 times would be assigned a value of "Marketer" (since we're favoring frequency over recency in this case).
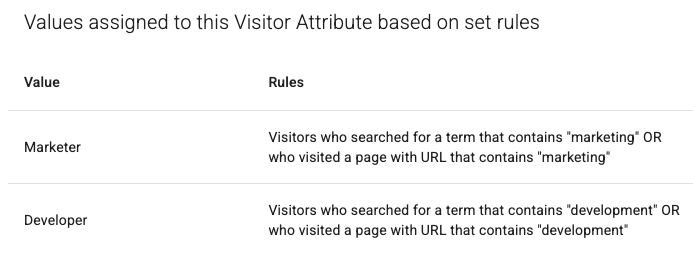
After saving your Visitor Attribute, you can see an overview of any Dynamic Visitor Attributes by clicking on the Inbound Data Sources tab and looking at the bottom section labeled Values assigned to this Visitor Attribute based on set rules:
Implicit Visitor Attributes
Geolocation
Geolocation is the visitor's geographic location based on their IP address, represented by a set of coordinates (latitude and longitude) in their visitor profile.
Note that coordinates can be the center of a city, or the center of a state when a city isn't available, or the center of a country when a city or state isn't available. Exact coordinates can't always be determined by a visitor's IP address. So if you plan to use geolocation to personalize content, plan accordingly.
The following implicit attributes are available for Team account plans and above. Check your plan.
Page Views and Visits
Page view and visit tracking allows you to personalize content based on the URLs in the visitor's history (for pages that contain your Clive tracking code) as well as the number of times they've visited your site.
A visit in Clive is any pages containing your Clive tracking code viewed within 30 minutes of each other. If a visitor hasn't viewed a page in your site(s) in over 30 minutes, their next page view will be considered a new visit.
Note: To prevent long page load times, only the last 1,024 page URLs will be taken into account for any given visitor when personalizing content based on Page Views.
Search Terms
Search terms in Clive are strings following query parameters in the URL when a visitor submits a search query on your site. For example in the following URL, the visitor's search term is "clive":
https://www.hannonhill.com/search/index.html?q=cliveThe Clive default parameters are s and q but these parameters can be customized in your site's settings. See Sites in Clive for more information.
Note: Like page views, only the last 1,024 search terms by any given visitor will be taken into account when personalizing content based on Search Terms.
Personalizing content with attributes
Now that you're collecting visitor attribute data, you can personalize content on your site to visitors with a particular attribute. See Smart Content in Clive for details.